Hexo迁移版本升级+nvm管理nodejs版本配置
前言
已经好久没有更新github主页上hexo推送的博客了(虽然没人看苦笑😂😂),作为耕宏男孩强身健体的同时,咋们也要做博客男孩,平时多记录下开发经验和学习知识,遇到问题就不需要慌忙打开百度搜索,直接打开博客浏览复习一遍效果更好。俗话说好记性不如烂笔头,看千万次不如写一次,妙手前提是练好本手,不然写出代码就是俗手(蹭高考作文热点😃😃)
我的github主页地址 https://xdj68.github.io
一、Hexo是什么?
Hexo是快速、简洁且高效的博客框架,具有以下特点
- 极速生成
- 支持 GitHub Flavored Markdown 和大多数 Octopress 插件
- 一键部署到 GitHub Pages、Heroku 等。
- 强大的 API,可无限扩展
- 数百个主题和插件
二、安装开发环境
因为工作电脑上(windows10系统)现有的nodejs版本项目不敢随意升级,发现可以用nvm版本管理器来控制管理nodejs和npm版本。磨刀不误砍柴功,工欲善其事,必先利其器,工具用的顺,每天早下班。nvm安装百度了一大堆但安装却遇到了问题不太一样,最后自己还是凭经验解决了,希望自己走过的坑(我已躺好)对大家有帮助就好🤣🤣。
1.nvm安装
下载地址:https://github.com/coreybutler/nvm-windows
Releases中下载nvm-setup.exe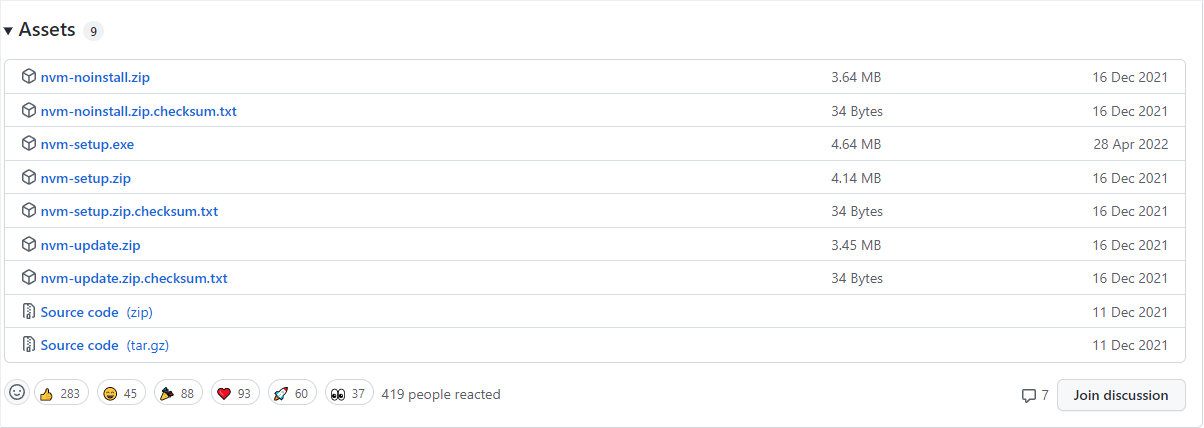
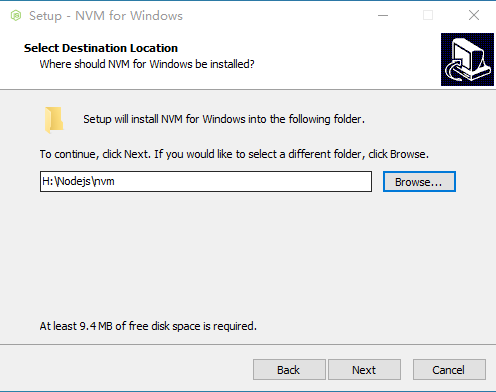
关键步骤
安装会出现俩个目录,一个是的NVM目录,另一个是Symlink目录,NVM目录装的是NVM相关包和配置,Symlink目录用于建立相应版本的nodejs文件夹的符号链接(还好看过一点linux shell指令大全🤣🤣)这俩个目录要保证目录内部是空的.之前nodejs的Symlink的安装目录非空导致出现以下问题:
新建文件为空目录
比如我是
H:/Nodejs/mvn
H:/Nodejs/nodejs
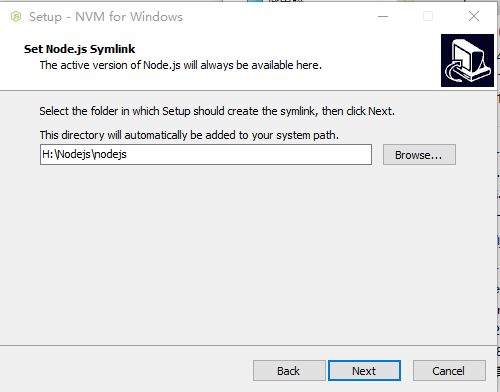

环境变量是自动添加的很贴心~~
exit code 1:没有权限;
CMD或者git bash 右键以管理员模式运行
2.nodejs安装
安装完nvm以下命令依次执行,先查看nvm版本,再下载安装nodejs版本,最后选择使用nodejs版本
1
2
3
4
5
6
7
8
9
| nvm -v 查看nvm版本
nvm ls 查看当前nodejs版本
nvm ls available 查看可获得的nodejs版本 可选LTS稳定版本
nvm install/nvm unisntall <version> 安装卸载版本
nvm use <version> 使用版本
node -v nodejs版本
npm-v npm版本
npm config set prefix "H:\Nodejs\node_global" 设置全局路径
npm config set cache "H:\Nodejs\node_cache" 设置全局缓存
|
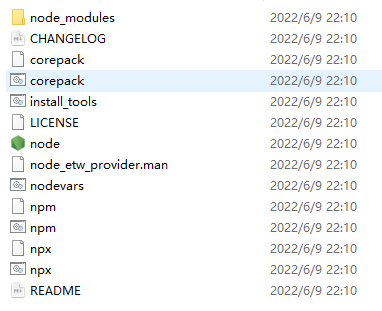
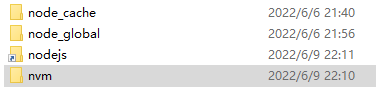
安装全部正常完成如下图所示
3.hexo安装
安装完hexo后,新建Blog空文件夹作为博客主文件夹,Blog文件夹中初始化hexo,下载next主题存放于./themes/next文件夹
1
2
3
4
5
| npm install -g hexo 安装hexo
hexo -v 查看hexo版本
hexo init Blog Blog文件夹中初始化hexo
cd Blog 进入Blog 文件夹
git clone https://github.com/theme-next/hexo-theme-next themes/next git下载next主题
|
三.hexo配置发布和next主题配置
1.hexo文章发布
hexo 支持markdown文件的渲染并以html格式在/Blog/public文件夹内生成相应文件
markdown文件编辑器推荐 Typora
写完博客后只要将文件后缀为.md文件复制到/Blog/source/ _posts 中即可
hexo 配置发布主要以下命令
| 命令 |
描述 |
| hexo generate 或 hexo g |
生成静态文件 |
| hexo server 或者 hexo s |
启动hexo服务,默认情况下,访问网址为: http://localhost:4000/ |
| hexo deploy 或者hexo d |
部署静态文件 |
| hexo clean |
清除缓存文件 (db.json) 和已生成的静态文件 (public) 在某些情况(尤其是更换主题后),如果发现您对站点的更改无论如何也不生效,您可能需要运行该命令 |
2.hexo主题配置
参考官网: https://hexo.io/zh-cn/docs/
Site
1
2
3
4
5
6
7
| title: 主标题
subtitle: 副标题
description: 描述
keywords: 关键字
author: 作者
language: 语言
timezone: 时区
|
Extensions
3.next主题配置
参考github:https://github.com/iissnan/hexo-theme-next
https://github.com/theme-next/hexo-theme-next
主题配置
主题配置
1
2
3
4
| scheme: Muse
#scheme: Mist
#scheme: Pisces
#scheme: Gemini
|
我用的Muse主题,因为左侧导栏可以随屏幕自动调节,并且可以展开隐藏,原来是Gemini主题突然发现Muse也很nice✌✌
菜单栏配置
1
2
3
4
5
6
7
8
9
| menu:
home: / || fa fa-home
archives: /archives/ || fa fa-archive
tags: /tags/ || fa fa-tags
categories: /categories/ || fa fa-th
sitemap: /sitemap.xml || fa fa-sitemap
schedule: /schedule/ || fa fa-calendar
commonweal: /404/ || fa fa-heartbeat
about: /about/ || fa fa-user
|
这个和我原配置稍许不同,研究半天才发现原来配置不显示菜单图标,后来看了下备注低版本配置没有fa fa-前缀😅😅
侧栏头像
1
2
3
4
| avatar:
url: /images/favicon.jpeg 自定义头像文件放置在主题的\next\source\images文件夹中
rounded: false
rotated: false
|
社交
1
2
3
4
5
6
7
8
9
| social:
GitHub: xxxx || fab fa-github
E-Mail:xxxx || fa fa-envelope
Weibo:xxxx || fab fa-weibo
Twitter:xxxx || fab fa-twitter
social_icons:
enable: true
icons_only: false
transition: false
|
打赏
1
2
3
4
5
6
7
| reward_settings:
enable: true
animation: true
reward:
wechatpay: /images/wechatpay.png 微信支付文件放置在主题的\next\source\images文件夹中
alipay: /images/alipay.jpg 支付宝支付文件放置在主题的\next\source\images文件夹中
|
4.hexo 迁移
迁移只要用原来的以下hexo 文件覆盖hexo init Blog下的相应文件即可
| 配置文件 |
描述 |
| _config.yml |
hexo的配置文件 |
| theme/ |
博客主题文件 |
| source/ |
博客文章源文件.md |
| scaffold/ |
博客模板文件 |
| package.json |
npm依赖包 |
| .gitignore |
Git提交忽略文件 |
四.next主题自定义配置
参考github: https://github.com/theme-next/hexo-theme-next
github登上小手一动先点个⭐哎,很舒服! 点击 more example here 根据自己喜好添加相应的插件
个人主页
1 添加日历
📆 theme-next-calendar: 一个简洁的hexo-next日历云插件
首先安装hexo插件
1
| npm install theme-next/theme-next-calendar
|
在next主题配置文件_config.yml配置
1
2
3
4
5
6
7
8
| CloudCalendar:
enable: true
language: zh-CN
single: true
root: /calendar/
calendarCdn: //cdn.jsdelivr.net/gh/theme-next/theme-next-calendar/calendar.min.js
langCdn: //cdn.jsdelivr.net/gh/theme-next/theme-next-calendar/languages.min.js
#disableSidebar: false
|
备注:按照作者配置发现网页报错,错误信息:
1
2
| calendar.min.js:1 Uncaught ReferenceError: jQuery is not defined
at calendar.min.js:1
|
由于缺少jquery文件,页面无法显示,这个简单,直接补上!
进入 \Blog\themes\next\layout_scripts 中 vendors.swig 添加
1
| {%- set js_vendors = js_vendors | attr('jquery', 'jquery-3.2.1.min.js') %}
|
进入 H:\Github\Blog\themes\next\source\lib 添加下载的
2 添加共享服务
🎁 hexo-next-share: NexT 的内容共享服务
我用的sharejs的分享,因为比较好看😄😄
首先安装hexo插件
1
| npm install theme-next/hexo-next-share
|
在next主题配置文件_config.yml配置
1
2
3
4
5
6
7
8
9
| sharejs:
enable: true
cdn:
js: //cdn.jsdelivr.net/npm/social-share.js@1.0.16/dist/js/social-share.min.js
css: //cdn.jsdelivr.net/npm/social-share.js@1.0.16/dist/css/share.min.css
networks: weibo,wechat,qzone,facebook,twitter,google
wechat_qrcode:
title: 请打开微信扫一扫
prompt:
|
备注: 配置QQ分享的话页面会报二维码的长度过长js错误,百度修改下js参数就行了,因为老了不用QQ算了不改了~~
3 添加 valine用户评论系统
原来用的gtalk需要登录github才能评论现换成valine评论系统,具体操作详见以下作者文章
Hexo 集成 Valine 评论系统 https://www.jianshu.com/p/b9e73c881729
备注:原来的Leancloud长时间不用需要激活,激活了N天没反应算了直接删除应用直接创建个新的应用,反正也没数据😅😅
4 添加透明泡泡漂浮动态背景
背景白色的太枯燥了,动态背景中发现了透明泡泡浮动背景很不错立马就借鉴下修改下博客的css背景样式✌✌
\next\layout_layout.swig 文件中新增标签
1
2
3
4
5
6
7
8
9
10
11
12
| <ul class="bg-bubbles">
<li></li>
<li></li>
<li></li>
<li></li>
<li></li>
<li></li>
<li></li>
<li></li>
<li></li>
<li></li>
</ul>
|
\next\source\css\main.styl 中新增背景布局
1
2
3
| // Background Layer
// -------------------------------------------------
@import "_background.styl";
|
\next\source\css 文件夹中新增 _background.styl 布局样式
1
2
3
4
5
6
7
8
9
10
11
12
13
14
15
16
17
18
19
20
21
22
23
24
25
26
27
28
29
30
31
32
33
34
35
36
37
38
39
40
41
42
43
44
45
46
47
48
49
50
51
52
53
54
55
56
57
58
59
60
61
62
63
64
65
66
67
68
69
70
71
72
73
74
75
76
77
78
79
80
81
82
83
84
85
86
87
88
89
90
91
92
93
94
95
96
97
98
99
100
101
102
103
104
105
106
107
108
109
110
111
112
113
114
115
116
117
118
119
120
121
122
123
124
125
| .container{
background: #ffffff;
background: -webkit-linear-gradient(to left, #becdd3 0%, #ffffff 30%,#ffffff 50%, #becdd3 100%);
background: linear-gradient(to left, #becdd3 0%, #ffffff 33%,#ffffff 67%, #becdd3 100%);
opacity: 0.8;
}
.sidebar {
background: rgba(0,0,0,0.902);
}
.bg-bubbles {
position: absolute;
top: 0;
left: 0;
width: 100%;
height: 100%;
z-index: -1;
}
.bg-bubbles li {
position: fixed;
list-style: none;
display: block;
width: 40px;
height: 40px;
background-color: rgba(255, 255, 255, 0.15);
bottom: 15%;
-webkit-animation: square 25s infinite;
animation: square 25s infinite;
-webkit-transition-timing-function: linear;
transition-timing-function: linear;
}
.bg-bubbles li:nth-child(1) {
left: 2%;
width: 150px;
height: 150px;
-webkit-animation-duration: 40s;
animation-duration: 40s;
}
.bg-bubbles li:nth-child(2) {
left: 5%;
-webkit-animation-delay: 10s;
animation-delay: 10s;
-webkit-animation-duration: 40s;
animation-duration: 40s;
background-color: rgba(255, 255, 255, 0.3);
}
.bg-bubbles li:nth-child(3) {
left: 13%;
width: 100px;
height: 100px;
-webkit-animation-delay: 10s;
animation-delay: 10s;
-webkit-animation-duration: 30s;
animation-duration: 30s;
}
.bg-bubbles li:nth-child(4) {
left: 18%;
width: 20px;
height: 20px;
background-color: rgba(255, 255, 255, 0.25);
}
.bg-bubbles li:nth-child(5) {
left: 20%;
-webkit-animation-delay: 15s;
animation-delay: 15s;
}
.bg-bubbles li:nth-child(6) {
right: 2%;
width: 150px;
height: 150px;
-webkit-animation-delay: 2s;
animation-delay: 2s;
-webkit-animation-duration: 50s;
animation-duration: 50s;
background-color: rgba(255, 255, 255, 0.2);
}
.bg-bubbles li:nth-child(7) {
right: 15%;
-webkit-animation-delay: 5s;
animation-delay: 5s;
}
.bg-bubbles li:nth-child(8) {
right: 12%;
width: 20px;
height: 20px;
-webkit-animation-duration: 20s;
animation-duration: 20s;
}
.bg-bubbles li:nth-child(9) {
right: 20%;
-webkit-animation-delay: 2s;
animation-delay: 2s;
-webkit-animation-duration: 60s;
animation-duration: 60s;
background-color: rgba(255, 255, 255, 0.3);
}
.bg-bubbles li:nth-child(10) {
right: 20%;
width: 160px;
height: 160px;
-webkit-animation-delay: 2s;
animation-delay: 2s;
}
@-webkit-keyframes square {
0% {
-webkit-transform: translateY(0);
transform: translateY(0);
}
100% {
-webkit-transform: translateY(-700px) rotate(600deg);
transform: translateY(-700px) rotate(600deg);
}
}
@keyframes square {
0% {
-webkit-transform: translateY(0);
transform: translateY(0);
}
100% {
-webkit-transform: translateY(-700px) rotate(600deg);
transform: translateY(-700px) rotate(600deg);
}
}
|
备注:虽然以前调过html css样式不过都是老的css样式,新的css3真没调过只能依葫芦画瓢调整按照页面版面调整下位置速度和延时😅😅
5 添加git远程部署
首先安装hexo插件
1
| npm install hexo-deployer-git --save
|
\Blog\_config,yml配置github主页地址
1
2
3
4
| deploy:
type: git
repo: https:
branch: master
|
备注:git远程部署文档 https://hexo.io/docs/one-command-deployment
部署您的站点hexo clean && hexo deploy。除非您使用令牌或 ssh 密钥进行身份验证,否则系统将提示您输入目标存储库的用户名和密码。hexo-deployer-git 不存储您的用户名和密码。使用git-credential-cache临时存储它们。
API可见github三种验证方式:用户名密码,token,SSH,SSH SSH 需要git生成公钥 token需要github生成token。因为原配置用户名密码的配置不跳用户名密码输入,按照文档git-credential-cache命令应该可以,正好用github新token验证方式部署。具体参考一下作者
https://zhuanlan.zhihu.com/p/465182461(友情提醒:token只能第一次看见,赶紧生成保存下,图上repo参数中token填github上生成的ghp_xxxxxxxxxxxxxxxxxx开头的鉴权码就可以了😄😄)
暂时配置这么多以后有新的配置再加。下篇应该要写设计模式或者JVM虚拟机了,毕竟看书不总结等于白看!!
工作搬砖简单坚持写博客难,希望能够坚持有时间写一写文章,积累下遇到的问题和解决方式以及知识点总结!!
我的github主页地址 https://xdj68.github.io